Autoencoders are unsupervised deep learning neural network algorithms that reduce the number of dimensions in the data to encode it.
The clue is in the name really, autoencoders encode data.
Once the data has been encoded through the algorithm, it is then decoded on the other side. The system is completed when the data on both sides of the encoding matches.
Three examples of applications of AutoEncoders are given below:
- Data Storage: The encoding processes are able to compress down large quantities of data, compressing it. This process, as you can imagine, has big benefits for data storage at scale.
- Feature detection: The process used to encode the data identifies features of the data that can be used to identify it. This list of features is used in multiple systems to understand the data. (Convolutional Neural Networks also do feature detection in images)
- Recommendation systems: One application of autoencoders is in recommendation systems. These are the systems that identify films or TV series you are likely to enjoy on your favorite streaming services.
You can use the pytorch libraries to implement these algorithms with python.
The process is similar to implementing Boltzmann Machines. This is because you have to create a class that will then be used to implement the functions required to train your autoencoder.
Before we jump into programming an AutoEncoder step by step, let’s first take a look at the theory.
A Gentle Overview of the Mathematics and Theory of Autoencoders
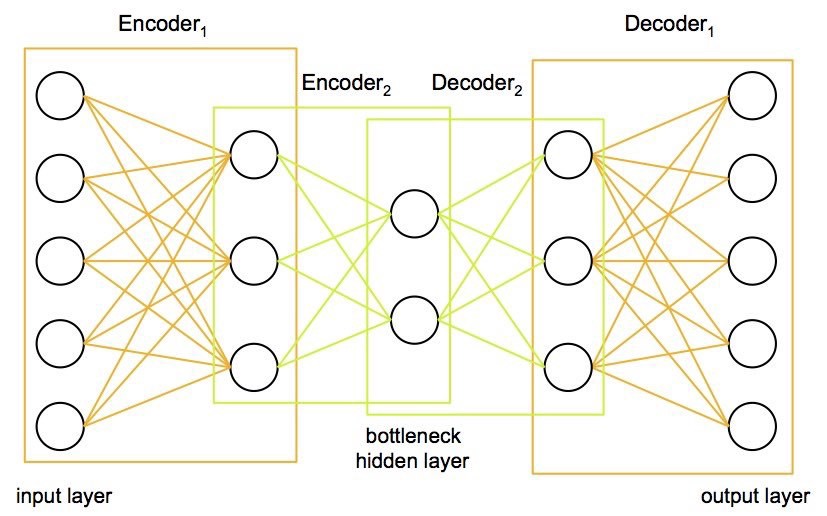
You can think of an AutoEncoder as a bottleneck system.
For example, you can take a dataset with 20 input variables. These variables are encoded into, let’s say, eight features. Then decoded on the other side back to 20 variables.
The image below shows the structure of an AutoEncoder.
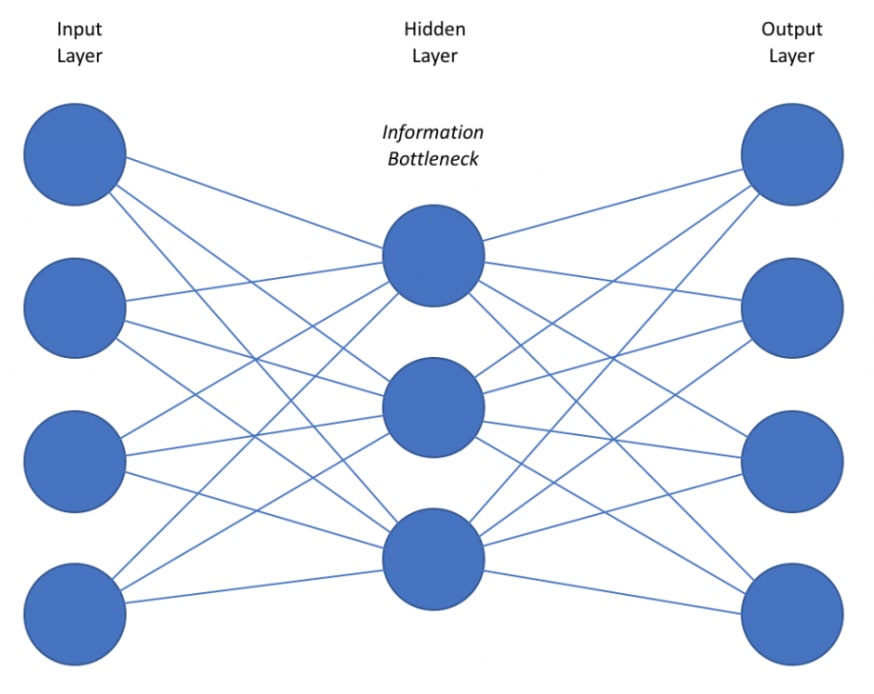
What you need to remember about autoencoders is that they are trained on the basis that they are trying to replicate the input data with the output.
You take an input of data. This data is encoded via the neural network.
When the data is encoded, the input is transformed into a set of features. These features are identified by the encoder to act as markers for decoding the output at the next stage.
Next, the data is decoded. Then the difference between input and output calculated. Finally, the error is back-propagated through the system.
The autoencoder updates the algorithm, and tries again.
Once the variables on each side match, the cycle ends.
The structure of the autoencoder becomes important when you are looking to leverage the encoded middle of the neural network to solve a problem.
Say for example you are trying to understand specific features that are present in your data set. These features are important for allowing you to better understand what the data is telling you.
This is where the bottleneck idea becomes relevant.


How an AutoEncoder works
You will recall from above that the aim of the autoencoder is the try and replicate the input data on the output.
Let’s imagine you have an input vector of 10 features. Then imagine an encoder with 10 neurons in the central layer of your neural network.
In this scenario, the autoencoder would quickly learn to map one feature of the input data to one neuron. This would ensure that the data maps easily to the output data correctly so the network would train quickly.
However, you will not have learned anything new about the data. Nor will you have been able to compress it once encoded.
Therefore, by giving the encoder fewer neurons in the middle of the network than there are features in the input, you force the system to find the relevant encoding features.
This need to find relevant features is where the bottleneck becomes important.
But what if you want to find more features than a bottleneck structure allows? What if you want to significantly reduce the amount of storage space of your data but can’t get the model to train?
In these scenarios, you may need to try a different structure for your autoencoder.
Let’s take a look at your options.
6 different types of AutoEncoders and how they work
The below list covers some of the different structural options for AutoEncoders. Which structure you choose will largely depend on what you need to use the algorithm for.
Sparse Autoencoder
This autoencoder has overcomplete hidden layers. This structure has more neurons in the hidden layer than the input layer. To avoid the Autoencoder just mapping one input to a neuron, the neurons are switched on and off at different iterations, forcing the autoencoder to identify encoding features.
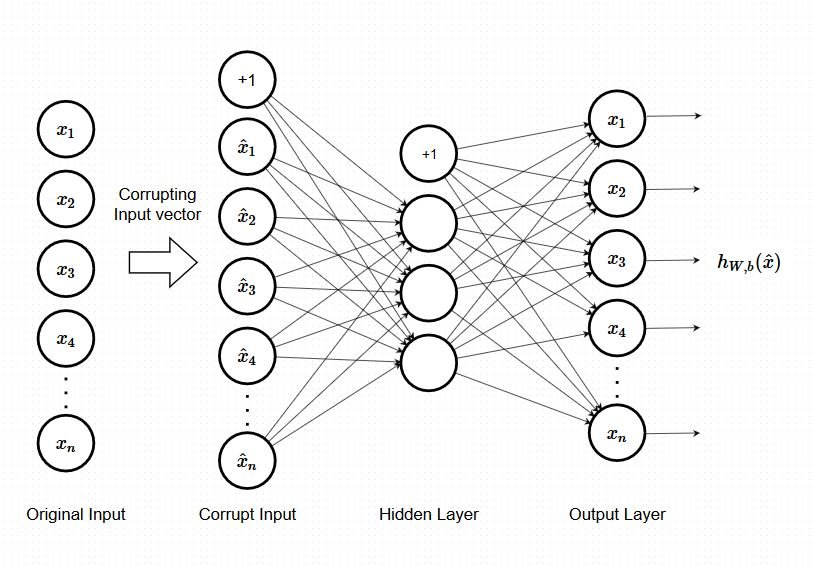
Denoising Autoencoder
This is another example with overcomplete hidden layers. In this case, the neurons are trained using a stochastic autoencoder
Denoising Contractive
A third example of an autoencoder with overcomplete hidden layers. This autoencoder adds a penalty that prevents hidden layer exact mapping
Stacked Autoencoder
Adds a second hidden layer. These are very powerful & can be better than deep belief networks
Deep AutoEncoder
A deep autoencoder is based on deep RBMs but with output layer and directionality. Train layer by layer and then back propagated
So now you know a little bit about the different types of autoencoders, let’s get on to coding them!
In the code below, I have added notes to source code worked with within the Udemy Deep Learning A-Z course.
Advertising Disclosure: I am an affiliate of Udemy and may be compensated in exchange for clicking on the links posted on this website. I only advertise for course I have found valuable and think will help you too. If you have found this content helpful, I recommend the course linked below which gave me a baseline understanding of the materials and python code shared here.
Deep Learning A-Z™: Hands-On Artificial Neural Networks
STEP 1: OBTAINING THE DATA AND PREPROCESSING
As always the first step in the process of creating any machine learning model is to clean your data!
Below is a YouTube tutorial series that runs through the basic of steps of data cleaning using pandas in python.
Don’t skip this step or you will be sorry when your model is junk 🙁
[CLASSES IN PYTHON]
The first 4 videos in this series cover data cleaning – total watch time ~50mins. Maybe grab a cuppa cause let’s be honest data cleaning is hella boring!
You also need to import the required libraries for your model (see the image below)

STEP 2: SHAPING THE NEURAL NETWORK
The second step is to shape your data so that it can be read by the neural network.
AutoEncoders like to have their input data in the form of a 2D array.
For example, if you are looking to make a recommendation system for movies you can have an array with movies as columns and users as the rows.
STEP 3: CONVERTING THE DATA TO TORCH TENSORS
Now it is time to get your data ready for use in PyTorch.
You will need to check your data type before doing this as Torch tensors are multidimensional matrixes that only contain one data type. If you do not use the correct one you may get an error.
For this example I have used FloatTensor however as my data came from a numpy array, another option is torch.form_numpy()
STEP 4: CREATING THE ARCHITECTURE OF THE NEURAL NETWORK
Ok so this is where it gets a bit more complicated.
In order to generate an AutoEncoder, you will need to create your own class.
If you have never done this before then I recommend watching the below tutorial to get familiar with the process.
The class that required for an AutoEncoder is created to do the following:
- Build out the activation function
- Calculates the probability of a neuron being activated
- Updates weights and biases
Below is an annotated example from the training I completed in the Deep Learning A-Z™: Hands-On Artificial Neural Networks course.
You can see that there is a lot happening here. Check my notes in the comments to understand what is happening.
I also recommend trying the course for yourself if you do not understand – it is well covered there and often available for $9.99!
STEP 5: Training the AutoEncoder
Congratulations you made it through creating your own class!
Well done.
In the below code is an example of how to:
- Initialize the epochs
- Creating batches for training
- Updating the weights
STEP 6: Testing The AutoEncoder
The final step of training the AutoEncoder is to test the algorithm on new data.
In this scenario you can copy down a lot of the code from training the AE.
Then you need to update it so that you are testing on one batch with all the data, and removing redundant calculations.
So what have we learned about autoencoders?
Let’s spend a little bit of time summarising what we have learned about autoencoders.
- AutoEncoders are used for identifying features and storing information
- The system works by forcing the encryption algorithm to identify features during the compression phase
- You can encode an autocoder in 5 steps in python with pytorch
- There are multiple different types of autoencoders that can be used depending on your needs
Feeling ready to tackle AutoEncoders now? I hope you’ve enjoyed this introduction.
What do you want to use autoencoders for? Let me know in the comments below