
Convolutional neural networks have many different applications.
But what is a convolutional neural network? And how can you start implementing them on your own data?
Today’s topic will explain the details of convolutional neural networks, of CNN’s, in enough detail so that you understand how they work.
Once we have the basic processes down, we’ll then go into how to implement them using python.
Don’t worry though, this isn’t going to be a super technical, mathematical tutorial. We’re just going to give you enough theory that you feel comfortable with what you are doing.
Let’s get stuck in shall we?
What is a CNN?
First and foremost we need to define what is a CNN.
Convolutional Neural Networks were developed to be able to encode and process image data within a deep learning framework.
What a CNN does, broadly speaking, is identify the edges of features in images, and converts them into a map of numbers.
These numbers are then processed and fed into an artificial neural network that can learn from them and make predictions.
That is a very broad, and very simplified, explanation of a CNN. Before we get into the practical tutorial though, I’m going to give you a bit more detail.
The Theory of Image Feature Mapping
As with artificial neural networks, convolutional neural networks take their inspiration from the human body.
Specifically, seeing as we are talking about image processing, they take from how humans see.
I’m sure you, like me, have often had to do a double-take when you look at something quickly and see something weird.
Or at least you think you see something weird.
Then when you look back, you realize that thing you thought was an alien spaceship was actually just a parked car with some glow sticks in the window.
This happens because the eyes process what they are seeing by picking out the different features.
When you feed an image into a CNN, it will strip back some of the layers of the image to just see feature plains.
These plains within the image may not make any sense to the human eye, but the computer understands them and can process them.
What are the different steps in processing an image?
To process an image using a CNN there are 4 steps.
In these 4 steps, your image will be taken from something that a human can recognize as a picture, through to a vector of numbers.
This vector then becomes a feature vector that is fed into an ANN for analysis and predictions.
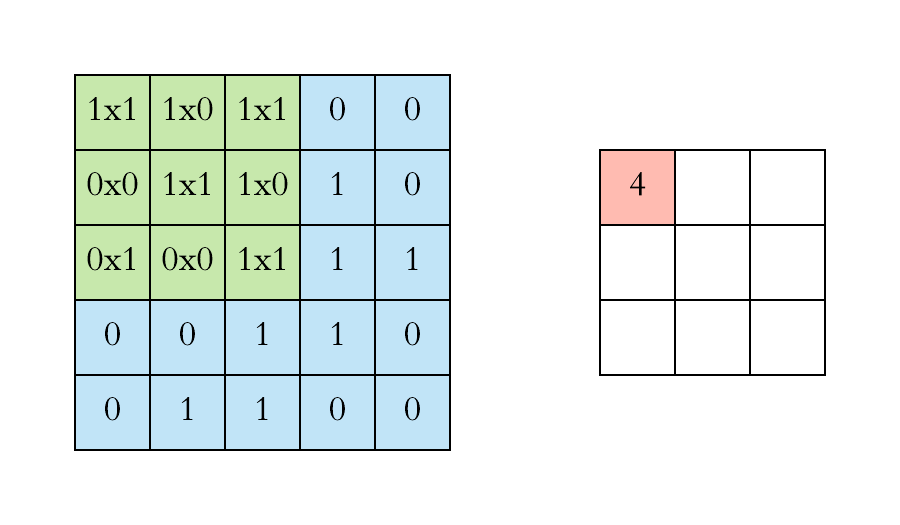
Step 1: The Convolution Operation
The convolution function is used to generate a feature map.
In this process, each pixel, or section, of the image is reviewed by the convolution function. The way that the feature map is developed is by mapping out how each section responds to the convolution function.
Similar to the process used by layers in an ANN, you will have layers of neurons that are stimulated by the convolution function.
There is some reasonably complicated math involved here which I am not going to go into now. However, if you want to understand in more detail, Wikipedia is an excellent place to start.
All you really need to understand is that after going through the convolution function, each section will now have a number associated with it.
Step 2: Pooling
Now that you have your feature map, you need to get this into a manageable data set.
This is where pooling comes in.
The algorithm will move across your feature map, a few sections at a time and pool the data there.
There are several ways that you can choose for your data to be pooled. For example, you could decide to keep only the maximum value from the section the algorithm is looking at.
Another option is to take the mean of all the data points in the section.
The main thing is that once you have completed pooling the data, you have a significantly reduced size of data to process.
This is important for running the algorithm efficiently.
Step 3: Flattening
This step is relatively self-explanatory. For your ANN to be able to take in your data as an input, it needs to be flat.
In this step you will take your pooled, and minimized dataset, transforming it into a 1D vector.
Here the algorithm you use for flattening will take each row of your ‘image pixel data and stack them on top of one another.
Step 4: Connection
The final step is where you connect the flattened out feature vector and feed it into your ANN as an input.
This is where you will finally start to see the fruits of your labours and be able to start making predictions from your data.
You can read more about setting up an ANN here.
How do you set up a CNN?
Ok, so that is a whistle-stop tour of the various stages involved in setting up a convolutional neural network.
Now I think it’s time we move onto how to start implementing them using python.
The CNN is essentially your data preprocessing step.
The network is used to convert your image into a dataset that can be understood by the computer.
Each step we described above in how to set up a CNN, uses a different class from the keras library.
Another critical thing to note is that CNN’s are generally used on classification problems.
This means they have a lot of overlap with setting up classification algorithms in python.
Ready to get started with Machine Learning Algorithms? Try the FREE Bootcamp
Setting up a CNN in python
I’m not going to spend too much time going into the details here because we’ve covered it all above.
However, below is a code snippet for implementing a simple CNN using keras and python.
I have labeled it to flag each section of the process as we described above.
And that’s it.
I know I was pretty surprised when I found out how easy it was to get access to such a powerful and complicated system.
See deep learning’s not that hard, is it!
What problems do you want to solve? Let me know in the comments below.
Advertising Disclosure: I an affiliate of Udemy and may be compensated in exchange for clicking on the links posted on this website. I only advertise for course I have found valuable and think will help you too.
If you have found this content helpful, I recommend the course linked below which gave me a baseline understanding of the materials and python code shared here.
Deep Learning A-Z™: Hands-On Artificial Neural Networks


Je désire connaitre vos projets futurs dans le domaine des CNN et Deep Learning